< All Topics
Building a model in discrete events mode
Posted
Updated
ByKasper Vestrup
These articles will go through building a basic routing model and coding a simple controller in the Discrete Events mode of Experior.
Building the Model
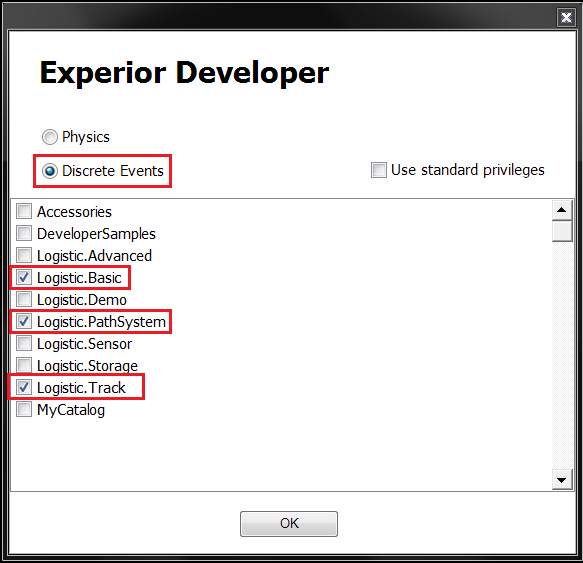
- Open Experior using the config shortcut
- Select the options as shown below when the start-up screen appears
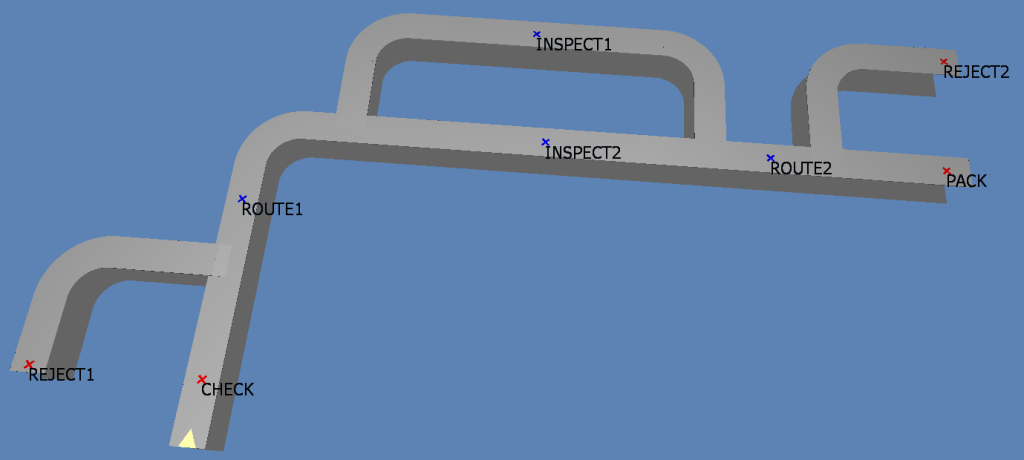
- The screenshot below shows the final layout of the model
- Note the positions of the action points and their names
- To begin select the Track catalog by clicking the tab
- Then click and drag a Straight into the construction area
- Adjust the length of the straight by either clicking and dragging from one of the endpoints or by selecting the straight and in the Properties window scroll down and adjust the value in the Length field
- As a note, tracks, by default, run from the red point to the blue point, so when attaching additional items opposite coloured points must be snapped together to ensure the model flows correctly
- Add the rest of the components, re-sizing as necessary
- To join the components together move them together so the the blue and red connection points merge, while holding down CTRL to snap the two components together
- To merge components to make diverters, simply drag one component over the other until both highlight, then hold the CTRL key to snap them together

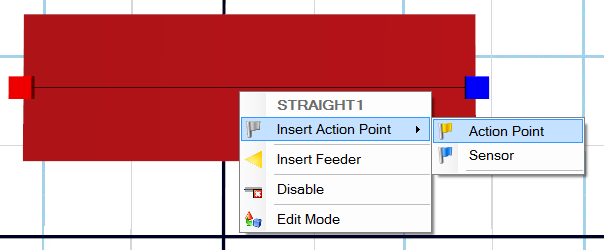
- To add an Action point right click on the component on which you want the Action point and selecting Insert Action point and then click Action point
- The Action point is represented by an X, initially in the centre of the track

- The Action point can be moved and modified by selecting it and editing the properties
- The ones needing to be changed as part of this exercise are outlined
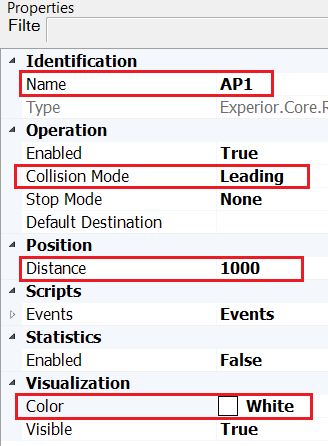
- You can add more than one Action point to a component
- Use the Distance property to ensure they are spaced apart correctly
- It is recommended to add them and position them one at a time so they don’t end up on top of each other
- Add a feeder to the first straight, by selecting the straight, right clicking and selecting Insert Feeder
- The properties for the Feeder should be as below
- As with the Action point, the properties that need changing are outlined in red

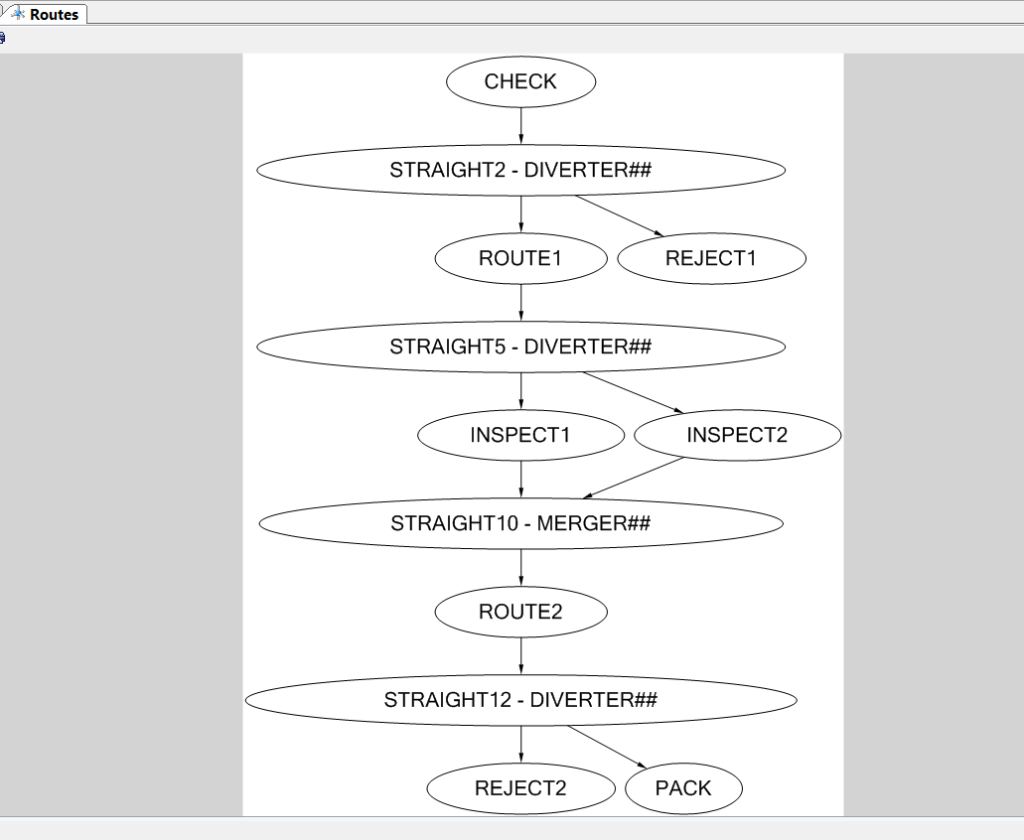
- Once the model is built and all action points are added and named as in the initial picture, click the Routes tab and it should look like the one below
Creating the Controller
- Within Experior a simple controller can be programmed to dictate the actions of loads when they reach certain action points on the route
- The code has been included below in its entirety with comments to provide guidance in what the code is actually doing
- First, open the Controller tab in Experior. It’s located on the same pane as the Model Construction area.
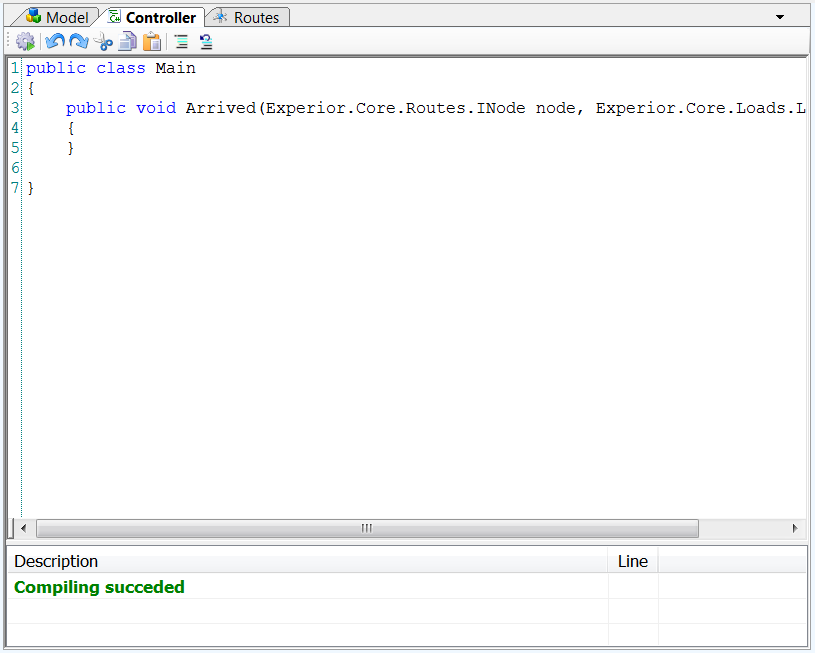
- Copy the code below and paste it into the Controller pane so that it overwrites the default lines already present
- public class Main
- {
- //This line is autogenerated as part of the model.
- public void Arrived(INode node, Load load)
- {
- //If the Actionpoint is named CHECK then
- if (node.Name == “CHECK”)
- {
- //Generate a random number from 1 to 5 & if the number equals 3…
- if (Experior.Core.Environment.Random.Next(1, 5) == 3)
- //…move the load to Actionpoint REJECT1…
- load.MoveTo(“REJECT1”);
- else
- //…if the number is not equal to 3 move the load to Actionpoint ROUTE1
- load.MoveTo(“ROUTE1”);
- }
- //If the Actionpoint is named REJECT1 then…
- if (node.Name == “REJECT1”)
- {
- //…remove the load from the model/system
- load.Dispose();
- }
- //If the Actionpoint is named ROUTE1 then…
- if (node.Name == “ROUTE1”)
- {
- //Generate a random number from 1 to 5 & if the number equals 3…
- if (Experior.Core.Environment.Random.Next(1, 5) == 3)
- //…move the load to Actionpoint INSPECT1…
- load.MoveTo(“INSPECT1”);
- else
- //…if the number is not equal to 3 move the load to Actionpoint INSPECT2
- load.MoveTo(“INSPECT2”);
- }
- //If the Actionpoint is named INSPECT1 then…
- if (node.Name == “INSPECT1”)
- {
- //…move the load to Actionpoint ROUTE2
- load.MoveTo(“ROUTE2”);
- }
- //If the Actionpoint is named INSPECT2 then…
- if (node.Name == “INSPECT2”)
- {
- //…move the load to Actionpoint ROUTE2
- load.MoveTo(“ROUTE2”);
- }
- //If the Actionpoint is named ROUTE2 then…
- if (node.Name == “ROUTE2”)
- {
- //Generate a random number from 1 to 5 & if the number equals 3…
- if (Experior.Core.Environment.Random.Next(1, 5) == 3)
- //…move the load to Actionpoint REJECT2…
- load.MoveTo(“REJECT2”);
- else
- //…if the number is not equal to 3 move the load to Actionpoint PACK
- load.MoveTo(“PACK”);
- }
- //If the Actionpoint is named REJECT2 then…
- if (node.Name == “REJECT2”)
- {
- //…remove the load from the model/system
- load.Dispose();
- }
- //If the Actionpoint is named PACK then…
- if (node.Name == “PACK”)
- {
- //…remove the load from the model/system
- load.Dispose();
- }
- }
- }
- What the code basically does is randomly determine where loads should go if the Action point has more than one destination
- More advanced controllers can be scripted using Visual Studio. This topic is covered here: Build a Controller
- When the code has been entered into Experior, press the Compile button to compile the script

- Now when the model runs loads, it will act according to the Controller code
Running the Simulation
- Introduce loads to the system by selecting the feeder and pressing the Space bar
- Next, under the Model menu, press the Running Man button so that it turns blue
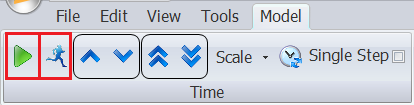
- Finally press the Play button to run the model