Extending the GUI with a Plugin
A plugin can be used to add custom functionality to Experior and you can also use it to extend the GUI by adding menu items and/or adding your own forms. A plugin is a dll that will be automatically loaded by Experior (provided the dll can be found in the installation directory of Experior).
You can create your own plugin by creating a separate Visual Studio project where your plugin class derives from Experior.Core.Plugin.

Toolbar.Button
To extend the GUI you can create a Button (Core.Environment.UI.Toolbar.Button) and add it to a toolbar.
In the example below a button is created and added to Model Toolbar in a Tab with name TestPlugin :
Core.Environment.UI.Toolbar.Button IOButton = new Core.Environment.UI.Toolbar.Button("SensorOutputs", btnIOToggle_Click);
IOButton.Tooltip = "Show outputs from sensors";
// add the button to the Model toolbar in a Tab with name "TestPlugin"
Core.Environment.UI.Toolbar.Add(IOButton, "TestPlugin");
This will look as follows:

When the example SensorOutputs button is clicked it will trigger the associated btnIOToggle_Click method.
In this example this will update a custom form.
Experior.Core.Forms.Form
Experior allows to add your own forms. You create your form similar to a normal System.Windows.Forms.Form.
However if you want to have a form that behaves similar to other Experior forms and is dockable, the created form should derive from Experior.Core.Forms.Form instead.
Also the FormType property has to be overridden.
public override Core.Forms.Docking.DockContent.FormTypes FormType
{
    get
    {
        return Core.Forms.Docking.DockContent.FormTypes.Permanent;
    }
}
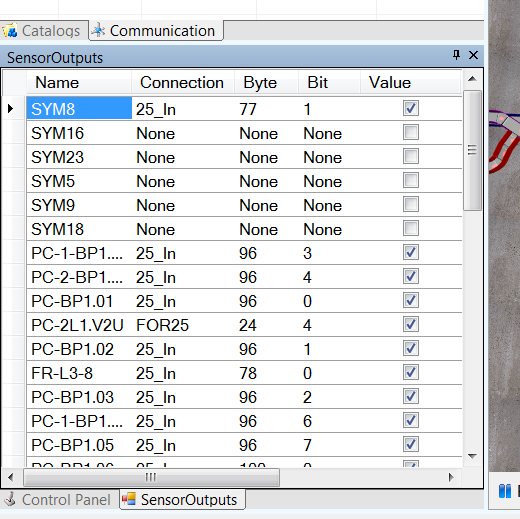
In attached example is a custom form that contains a datagrid will info of all Outputs for the sensors in your model. The form looks as follows when it is docked:

The complete plugin can be downloaded here.
