Load class
Loads in Experior are used to model pallets, boxes, bags, that are transported by material handling equipment like conveyors and lifts.
The main namespace for loads is Experior.Core.Loads and the Experior.Core.Loads.Load contains some factory methods for creating loads with different load types.
The Experior.Core.Loads.Load class derives from the RigidPart class and hence inherits a lot of its interaction with the PhysX engine from it.
Note that there are some important differences related to loads depending on whether Experior is running in physics mode or discrete mode. In physics mode a load is considered a dynamic object (unless you disable the load or make it Kinematic). This implies that the position of the load and its orientation is determined by the underlying nVidia Physx engine who calculates this by applying all the forces/torques on it. In discrete mode no physics engine is used. There it is important to know that, unless a load is made undeletable, it will always be on a Route (Experior.Core.Routes.Route) or an Action Point (Experior.Core.Routes.ActionPoint). So, by default, if a load is no longer on a Route/Action Point then it will be deleted by the underlying engine.
Below we will illustrate a set of the main methods/properties of the Experior.Core.Loads.Load class.
Some methods/properties related to the interaction of the loads with the physics engine
Sleep(): This is used in the physics mode to make the load unresponsive to the physics engine. The load will no longer respond to the forces applied to it. Note that you can WakeUp/Enable a load by clicking on it in the working area.
WakeUp(): This is used in the physics mode to “wakeup” a sleeping load and make it respond again to the physics engine. The load will again respond to the forces applied to it.
Vector3 CenterOfMassOffsetLocalPosition: When the physics engine applies a force to a load to make it moving it applies this force into the center of mass of a load. By default a loads density is equally distributed over the whole volume of the load and hence the center of mass of the load is also the geometrical center of the load. By providing the CenterOfMassOffsetLocalPosition you make it possible to move this center of mass and e.g. put the center of mass lower than the geometrical center to decrease the collapsing of a load.
NOTE: The value provided to this property is an absolute value. The CenterOfMassOffsetLocalPosition property provided in the property window of a feed is a relative one where 1 represents 100%.
Example and illustration.
In the example below the CenterOfMassOffsetLocalPosition of the loads with dimensions (0.5f,0,5f,0.5f) is set to (0, -0.2f, 0) when the load enters a sensor: So the force will be applied 200mm below the geometrical center of the load.
myLoad.CenterOfMassOffsetLocalPosition = new Vector3(0, -0.2f, 0);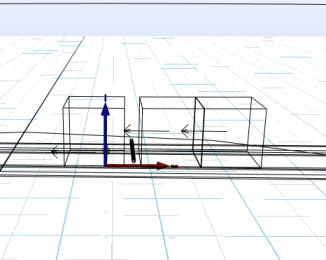
You can clearly see that the force on the load is applied lower than before it entered the sensor.
bool Gravity: This indicates whether a load is subject to gravitational force. If you set it to false a load will not fall, but will remain subject to other forces like the force applied to it on a conveyor.
float Density: This represents the (uniform) density of the load. It is used to calculate the weight of the load ( Volume calculates as length times width times height multiplied with the Density).
bool Embedded: This indicates whether the load is embedded in another entity and hence whether it should be saved when saving the model. When the Embedded property is true the load is not saved. (In discrete mode loads are never saved).
bool Enabled: Setting Enabled to false is similar to calling Sleep() and setting Enabled to True is similar to calling WakeUp().
bool Kinematic: By default a load is a dynamic object by the PhysX engine which implies that its position and orientation will be determined by the physics engine by calculating all forces/torques applied to the load. By setting the Kinematic property to true, the load is made a kinematic object instead of a dynamic one. This implies that the load will no longer respond to the forces applied to it and the position and orientation of the load is controlled by the user. (Using the Methods/properties related to positioning of a load described below).
bool Rigid: Returns true when the load is a rigid body for the PhysX engine.
bool Sleeping : Returns true when the load has been “put to sleep” and is longer taken into account by the physics engine.
DeSelect(): Deselects the load.
Select(): Selects the load. The properties of the load will be shown in the properties window and the load will get the Select color.
HighLight(Color color): Highlights the load by changing the highlight color to the given color. This is only a temporary change. When the load is UnHighLighted is restores its original color (given by the Color property.
UnHighLight(). UnHighlights the load, as a result it will get the color back as defined by the Color property.
Color Color: Returns/sets the normal color of the load (when not selected or highlighted).
bool Selectable: Indicates whether a load can be selected by the user. If you set this property to False the user will not be able to select the load.
bool Selected: Returns True when the load is currently selected, False otherwise.
bool Transparent: Returns True when the color of the load is transparent.
Methods/properties related to deleting of a load
Dispose(): Called when deleting the load
bool Deletable : Property to indicate whether the load can be deleted. If this property is set to False, trying to delete the load will fail (e.g. when resetting the model, which normally deletes all loads in the model)
bool UserDeletable: Property to indicate whether the user can delete the load (e.g.by selecting it and pressing the Delete button)
event DisposeEvent OnDisposed : This event is called when the load is completely disposed (deleted)
event DisposeEvent OnDisposing : This event is called beginning to dispose a load
Methods/properties related to grouping/deleting of a load
Remark: In discrete mode the grouping/ungrouping of loads happens instantaneously and immediately after calling the Group/UnGroup methods the grouped load or ungrouped loads are available. Due to the nature of the physics engine this is postponed until the physics engine has finished its cycle of applying forces to loads. So in physics mode the grouped load is available when the OnGrouped event is raised.
Group(List<Load> loads): The current load will be grouped with all loads from the given list. They loads are grouped at their current relative position and the current load becomes the master load.
Group(Load load): The current load will be grouped with the given load. Both loads keep their relative position.
Group(Load load, Vector3 localposition): The given load will be grouped with the current load. It will be positioned given the relative position.
Group(List<Load> loads, List<Vector3> positions, List<Matrix> orientations): The given load is grouped with all loads from the given list of loads. Each load of the list is positioned according to the given relative position as provided in the positions list and with the orientation as described in the given orientations list of orientation matrices.
Group(Load load, Vector3 localposition, Matrix localorientation): The given load will be grouped with the current load. It will be positioned given the relative position and with the relative orientation as defined in the given orientation matrix.
Group(Load load, Vector3 localposition, float localyaw, float localpitch, float localroll): The given load will be grouped with the current load. It will be positioned given the relative position and with the relative orientation as defined by the relative Euler angles : localyaw, localpitch, localroll.
UnGroup(List<Load> loads): ungroups all loads from the given list of loads from the current load (masterload).
UnGroup(int loads): this will ungroup the given amount of loads from the current load. If the given number is larger then the total number of grouped loads it will ungroup all of them. If the number is smaller it will ungoup the given amount. The sequence of ungrouping is as follows: the last one grouped will be ungrouped first.
UnGroup(Load load): UnGroups the given load from the current load (masterload).
UnGroup(): UnGroups all loads that form the current load (masterload).
Collection Grouped: Returns the collection of loads that are grouped with the current load (the masterload). The Grouped collection allows to request the Length, Width, Height of the combined grouped load and you can iterate over all slave loads using the Items property of the Grouped property of the master load.
bool IsGrouped: Returns true for a load that has been grouped with a masterload. The materload itself will return false for this IsGrouped property.
event GroupedEvent OnGrouped: Is called when the load has been grouped. (See remark above concerning physics/discrete mode). The delegate has as argument the sender (masterload) and the result.
Below you find an example and screenshots of grouping:
int createdloads=1;int totalnumber=10;
Core.Resources.Mesh mesh=Common.Meshes.Get("Tote_Red");
Load ld1 = Load.Create(mesh, Length, Height, Width);
ld1.Switch(linkedactionpoint);
while (createdloads < totalnumber)
{ // create 4 more loads of given mesh and group them
Load ld = Load.Create(mesh, Length, Height, Width);
ld1.Group(ld,new Vector3(0,(Height-0.01f)*createdloads,0));//have totes slightly overlap
// ld1.Group(ld,new Vector3(0,(Height+0.05f)*createdloads,0)) // create empty space between loads
createdloads++;
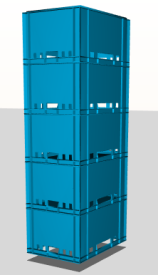
}Above example results in the following stacks of totes being created depending whether we had loads overlapping or with empty space between them:

Example of iterating over the grouped loads:
Experior.Core.Environment.Log.Write("Total dimensions are " + ld1.Grouped.Length + "; " + ld1.Grouped.Height + "; " + ld1.Grouped.Width);
foreach (Load grl in ld1.Grouped.Items)
{
    Experior.Core.Environment.Log.Write("   " + grl.Length + "; " + grl.Height + "; " + grl.Width);
}
Methods/properties related to movement of a load in discrete mode
MoveTo(string destination): This method will initiate a load traveling on its current route to the actionpoint with the name equal to the given destination. If the destination actionpoint is not reachable through routes connected to the current route then a message will be logged : ‘Can’t continue: “destination” is unreachable (“current actionpoint name“)’
MoveTo(string source, string destination): This method will initiate a load traveling on its current route from the source actionpoint to the actionpoint with the name equal to the given destination.
Release(): This method will release a load that is stopped.
Release(float delay): This method will release a load that is stopped after the given delay has passed. The delay is given in seconds.
Stop(): This method will stop a load on its Route/ActionPoint. The load will wait there until it is released.
Switch(Route to): This method will instantaneously take the load and put it at the start of the given route.
Switch(Route to, float distance): This method will instantaneously take the load and put it at the given distance from the start of the given route.
Switch(Route to, bool keepGlobalOrientation): This method will instantaneously take the load and put it at the start of the given route. When the keepGlobalOrientation argument is true than the load will keep its current global orientation (Yaw, Pitch, Roll), otherwise it will use the properties of the route.
Switch(Route to, float distance, bool keepGlobalOrientation): This method will instantaneously take the load and put it at the given distance from the start of the given route. When the keepGlobalOrientation argument is true than the load will keep its current global orientation (Yaw, Pitch, Roll), otherwise it will use the properties of the route.
Switch(string actionpoint, bool keepGlobalOrientation): This method will put the load on the actionpoint with the given name.When the keepGlobalOrientation argument is true than the load will keep its current global orientation (Yaw, Pitch, Roll), otherwise it will use the properties of the actionpoint. If no actionpoint can be found with the given name the call is ignored.
Switch(ActionPoint ap, bool keepGlobalOrientation): this method will put the load on the given actionpoint. When the keepGlobalOrientation argument is true than the load will keep its current global orientation (Yaw, Pitch, Roll), otherwise it will use the properties of the actionpoint.
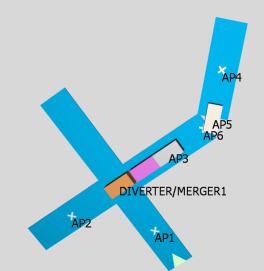
In the illustrations below you can see the difference between switching a load (to AP6) with the keepGlobalOrientation argument true or false:

Switch(string actionpoint): This method will put the load on the actionpoint with the given name. If no actionpoint can be found with the given name the call is ignored.
Switch(ActionPoint ap, ActionPoint.Edges edge): This method will put the load on the actionpoint. The edge argument has 3 possible values ActionPoint.Edges.Leading, ActionPoint.Edges.Trailing and the defaultActionPoint.Edges.Center. If its value is Edges.Trailing then the load will be put on the actionpoint in such a way that the position of the actionpoint matches the trailing back of the load. If its value is Edges.Leading then the load will be put on the actionpoint in such a way that the position of the actionpoint matches the leading front of the load.
Note: This assumes that there is sufficient room on the route to do the switch, meaning that the center of the load should be on the route. Suppose you have an ActionPoint at the start of a route. In that case it is only possible to do the switch with edge ActionPoint.Edges.Center or ActionPoint.Edges.Trailing because using ActionPoint.Edges.Leading implies that the center of the load would not fit on the route.
Switch(ActionPoint ap): This method will put the load on the given actionpoint.
ActionPoint ActionPoint: This getter property returns the current actionpoint of the load or null if the load is on a route and not at an actionpoint.
string GoTo: This property allows to get of the name of the current final destination actionpoint. By setting this property to the name of an actionpoint the load will set it as its final destination and travel towards it.
Vector3 RouteOffset: Normally a load travels on the route with the center of the load moving over the route. By using the RouteOffset property you can chnage this and have the center of the load moving at the given relative position from the route.
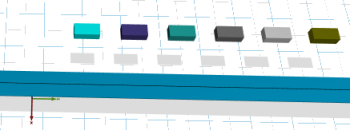
Below you see an illustration of loads moving where load.RouteOffset = new Vector3(1.2f, 0.3f, 0f);
bool Stopped: This getter property returns True when the load is currently stopped, False otherwise.
float WaitingTime: Setting this property makes a load wait at its current position. The waiting time is provided in seconds. When this waiting time is elapsed the load will trigger the FinishedWaiting event and continue.
FinishedWaiting FinishedWaitingEvent: This event is triggered by a load when its WaitingTime has elapsed.
Methods/properties related to attaching a load to a RigidPart
public bool IsAttached: This getter property returns true when the load is currently attached to a RigidPart and hence if following the movement of this part.
event AttachedEvent OnUnAttached: This event is triggered when the load gets unattached of the RigidPart it was attached to.
event AttachedEvent OnAttached: This event is triggered when the load gets attached to a RigidPart was attached to.
Attaching loads is done using one of the Attach methods of the Experior.Core.Parts.RigidPart class.
Custom Data
object UserData: The developer can add custom data to a load by using this UserData property. E.g you can create you own TransportOrder class containing data from the WMS like PurchaseOrder,Customer, Source, Destination, DueDate,… and attach it to the load: myload.UserData = aTransportOrder;
You can inspect the data again by casting the UserData back to the class it was given: string customer = (myload.UserData as TransportOrder).Customer;
Methods/properties related to prositioning of a load
float Yaw: This getter/setter property reflects the rotation angle (in radians) of the load around the Y-axis
float Pitch: This getter/setter property reflects the rotation angle (in radians) of the load around the X-axis
float Roll: This getter/setter property reflects the rotation angle (in radians) of the load around the Z-axis
Vector3 Position: This property returns the global 3 dimensional coordinates of the center of the load. In the physics mode the position is determined by the physics engine or its movement on tracks and in discrete mode by its movement on the routes. When the load is made Kinematic or Disabled then it makes sense to directly set the position of the load.
Matrix Orientation: This property returns or sets the orientation of the load as defined in the Microsoft.DirectX.Matrix structure.
Translate(Vector3 distance, float time): This will translate a stopped load over the given vector during the given time. After the given time the load remains at its position after the translation until it is released. In case the load continues moving on a route it will jump back to its position on the route. So note that the load should not be moving on a route when calling this translate method otherwise you get some strange wave movement during the given time where the load is trying to translate over the given vector but is pulled back by it having to move on the route.
Translate(Action action, Vector3 distance, float time): This method is similar to the Translate method above except that at the end of the translation of the load over the given vector distance the given action will be executed. The given System.Action is a delegate that you can use to pass a method as a parameter without explicitly declaring a custom delegate. The encapsulated method must correspond to the method signature that is defined by this delegate.This means that the encapsulated method must have no parameters and no return value.
In the example below a load is translated over 3 meter in the Y-direction in 2 seconds and at the end of the movement the load is switched to actionpoint “AP10” and then released :
currentload.Translate(()=>SwitchToAP10(), new Vector3(0, 3.0f, 0), 2f);where:
public void SwitchToAP10()
{
    if(currentload != null)
    {
        currentload.Switch("AP10");
        currentload.Release();
    }
}